
This article was updated to support v12.0 and newer of Goliath Performance Monitor.
The below sections will take you through the configuration process to begin monitoring Virtual Apps and or Virtual Desktops to automatically collect Delivery Group Inventory, User Session Data, enable Citrix session monitoring and assemble the Topology View.
Prerequisites
- Versions 7.6 to 2203 supported
- Windows 8-10 (Desktop), 2012 R2 – 2022 (Server)
- Service Account with the following privileges is required for Inventory & Metric Collection:
- Read-Only Admin within Citrix Studio
- Windows Administrator on the Delivery Controller
- requires permission to run a windows service
- If using Citrix PVS, the service account must also be a member of the PVS Farm Administrator group and have Windows Admin Rights on the Provisioning Servers, also to run a service.
- Citrix OData 3.0 (Check your OData version)
- Citrix Profile Manager must be enabled on the VDA for Logon Duration metrics
- PowerShell 3.0 or newer required on the Delivery Controllers and VDAs
- Full Microsoft SQL Server suggested for full implementations of Goliath Performance Monitor
- Support for real-time process metrics can be resource intensive requiring us to determine viability that we would test in the implementation.
- If you are not licensed to monitor your entire Citrix environment, (ie Proof of Concept, Product Evaluations, etc) it is necessary to Configure Inventory Filtering.
Topology View Prerequisites
- Topology View License Key
Article Contents
Monitoring Configuration
Please Note: in this document we refer to Virtual Apps as being published applications and desktops and Virtual Desktops as being VDI
Before proceeding, if you are licensed for VMware vCenter or Citrix XenServer for hypervisor monitoring, it is required to configure the hypervisor monitoring first, before attempting to configure the Citrix Virtual Apps & Desktops environment(s). If this has not been done, please reference the appropriate configuration articles to do do.
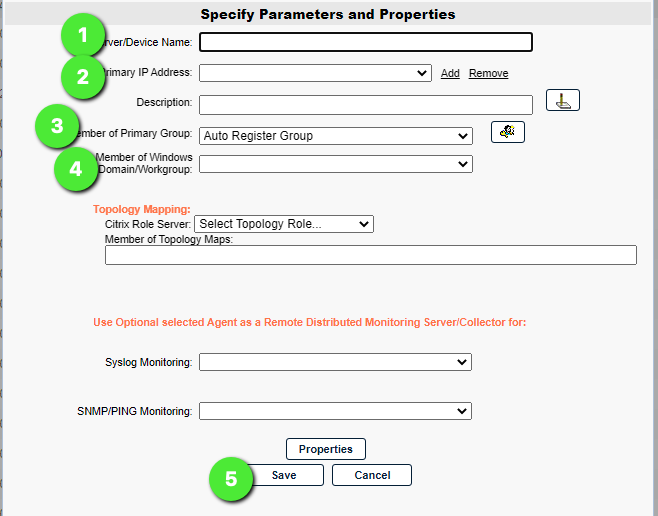
- Navigate to the Configure tab, and select the Inventory sub menu
- On the inventory page, locate the Delivery Controller.
- If it is not listed within the product, you can add it by clicking the New button at the top of the page and completing the appropriate information (name, ip address (not FQDN), domain, etc) as displayed in the following image:

- If it is not listed within the product, you can add it by clicking the New button at the top of the page and completing the appropriate information (name, ip address (not FQDN), domain, etc) as displayed in the following image:
- Next, identify if an agent has been installed to the Delivery Controller. You can do this by looking in the Agt column for that inventory entry. If there is a green box in that column, you can proceed to step 11, below. If there is no box in that column, or the box is red, please proceed to the next step.
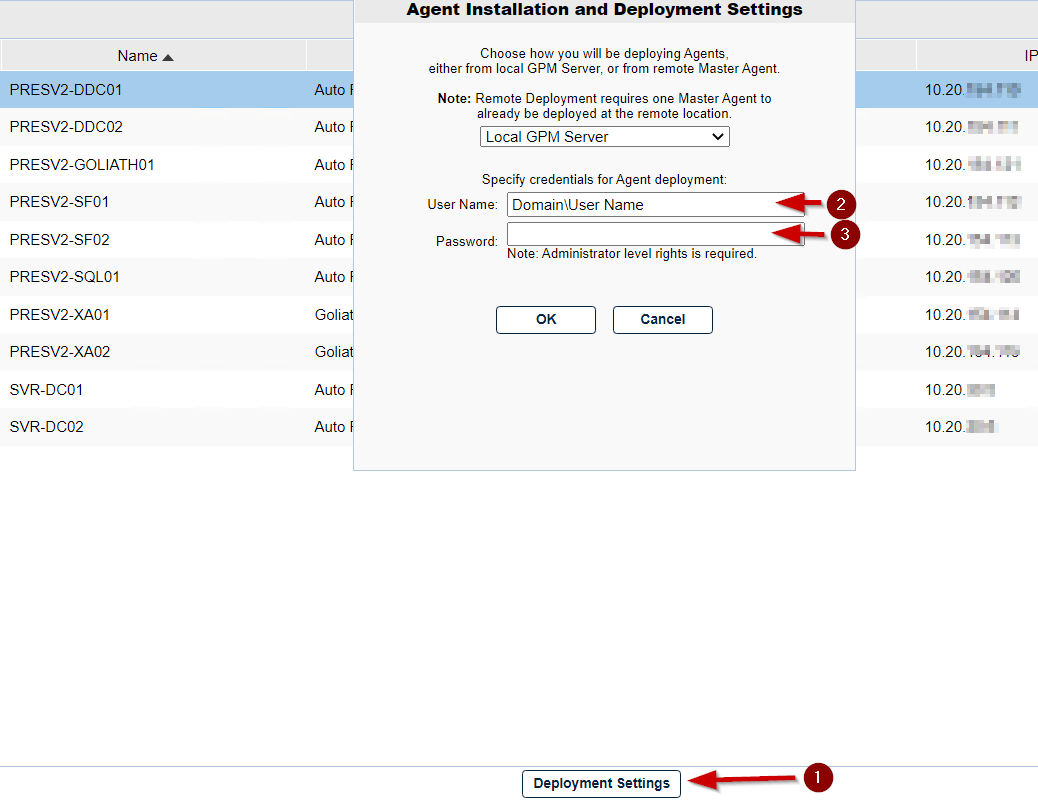
- In order to enable Citrix monitoring and inventory collection, first deploy an agent to the Delivery Controller. This can be done by selecting Manage Agents at the top of the page.
- When the Manage Agent dialog opens, select the Delivery Controller(s) you would like to deploy an agent to.
- The first time an agent is deployed to a server, you must choose the Deployment Settings button and enter one-time local administrator credentials in order to copy over and run the install files. These credentials are not saved anywhere in the database. Once an agent connection has been establish this step is not needed.
- Click the Install/Update Agents button at the bottom of the dialog to begin the agent installation.
- You will see a prompt notifying you to enter credentials if this is the first agent deployment, click OK the bypass and begin the agent installation.
- Depending on the number of Agents that are being installed, the process may take a few minutes to complete (do not refresh the page).
- As the agent installation succeeds green checkboxes are displayed next to device name in the table.
- Once all agents have been installed, a prompt is displayed. Click Close at the bottom of the dialog to return to the inventory page.
- Next confirm the agents are connecting to the product by looking at the Agt column and identifying a green box. This process could take1-3 minutes and you may need to refresh the page.
-

- Please note, if you do not see an icon in the Agt column after 5 minutes, confirm that the Goliath Server is accepting inbound TCP communication on all firewall levels (Domain, public, private) and that the server where the agent is installed is allowing outbound TCP communication for all firewall levels.
-
- Once the agent for the Delivery Controller is connected, select the checkbox to the left of the DDC name entry and click Edit.
- When the edit pane is open for the Delivery Controller, under the Citrix XenApp and XenDesktop Monitoring section, add a Citrix Service account credentials that has Read-Only access in XenServer and check the boxes for which components you would like to enable monitoring.
- If using Published Apps & Desktops, please also check the box for Enable Citrix Delivery Group/Farm Inventory Auto-Update
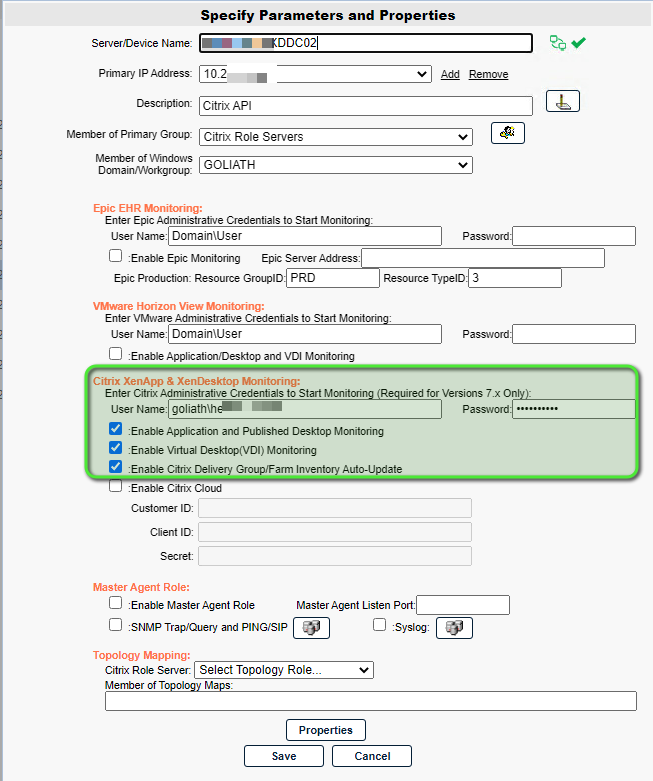
- If using Published Apps & Desktops, please also check the box for Enable Citrix Delivery Group/Farm Inventory Auto-Update
- When complete, click Save.
- Next, restart the MonitorIT Agent Service. To do this, click the green box in the Agt column and approve the agent restart prompt.
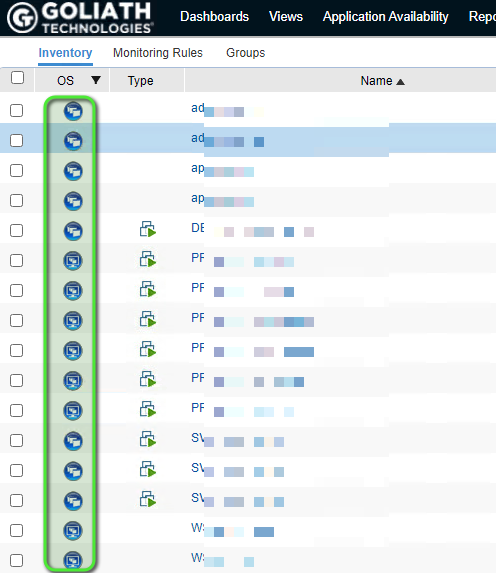
- After about 5 minutes if you Refresh the inventory page you will now see your XenApp/XenDesktop inventory indicated by the blue circle Citrix icon in the ‘OS’ column.
Topology View Configuration
The Citrix Topology View allows users to visualize the servers involved in delivering Applications/Desktops to end users. Topology view combined with monitoring rules allows for proactive support at a glance, which allows you quickly resolve environment issues.
- Navigate to the Configure tab, and select the Inventory sub menu
- On the inventory page, locate the Storefront Server(s).
- If it is not listed within the product, you can add it by clicking the New button at the top of the page and completing the appropriate information. (name, ip address, domain, etc) - repeat this step for each Storefront Server if you have more than one.
- If it is not listed within the product, you can add it by clicking the New button at the top of the page and completing the appropriate information. (name, ip address, domain, etc) - repeat this step for each Storefront Server if you have more than one.
- Next, identify whether or not an agent has been installed onto the Storefront Server(s). You can do this by looking in the Agt column for that inventory entry. If there is a green box in that column, you can proceed to step 11 below. If there is no box in that column, or the box is red, please proceed to the next step.
- In order to enable monitoring we’ll need to first deploy an agent to the Storefront Server(s). This can be done by selecting Manage Agents at the top of the page.
- When the Manage Agent dialog opens, select the Storefront Server(s) that you would like to deploy an agent to.
- The first time an agent is deployed to a server, you must choose the Deployment Settings button and enter one-time local administrator credentials in order to copy over and run the install files. These credentials are not saved anywhere in the database. Once an agent connection has been establish this step is not needed.
- Click Install/Update Agents at the bottom of the dialog to begin the agent installation.
- You will see a prompt warning you to enter credentials if this is the 1st agent deployment, click ok the bypass and begin the agent installation
- Depending on the number of Agents that are being installed, the process may take a few minutes to complete (refresh the page)
- You will see green checkboxes appear as the agent installation succeeds
- Once all agents have been installed, you will receive a prompt that the installation is complete. You can click the Close button at the bottom of the screen to return to the inventory page.
- Once on the Inventory screen, you can confirm that the agents are connecting into the product by looking at the Agt column and identifying a green box. This could process could take a 1-3 minutes, you’ll need to refresh the page as well.
-
- Please note, if you do not see any icon in the Agt column after 5 minutes, confirm that the Goliath Server is accepting inbound TCP communication on all firewall levels (Domain, public, private) and that the server where the agent is installed is allowing outbound TCP communication for all firewall levels.
-
- Once the agent for the Storefront Server(s) is connected, select the inventory entry and click the ‘Edit’ button at the bottom of the page.
- A new pane will appear, at the bottom of the pane you will see a section labeled "Topology Mapping".
- Use the Citrix Role Server drop-down menu and choose the option for Storefront
- Next, click in the white space for the "Member of Topology Maps" field. You will then have checkbox options to chose which topology maps you want to add the storefront server to.
- Click Save and repeat the these steps for any additional Storefront Servers. Please note, it can take about 30-60 mins for the servers to appear in the Topology View.

- Repeat Step #2 to confirm and or add in your NetScaler(s) if applicable.
- Once the NetScaler(s) are listed, select the inventory entry and click the Edit button at the top of the page.
- A new pane will appear, at the bottom of the pane you will see a section labeled Topology Mapping.
- Use the Citrix Role Server drop-down menu and choose the option for Netscaler
- Next, click in the white space for the Member of Topology Maps field. You will then have checkbox options to chose which topology maps you want to add the storefront server to.
- Click "Save" and repeat these steps for any additional NetScalers. Please note, it can take about 30-60 mins for the servers to appear in the Topology View.
Post Configuration: What’s Next?
Now that Citrix monitoring has been enabled in Goliath Performance Monitor, to start collecting user session data and alerting on faults taking place you’ll need to deploy an agent onto your session hosts and VDI’s. Please see additional documentation.
Please note: If you are using PVS or MCS to deploy your Citrix environment, the agent will need to be installed into the Gold and or Master Image(s).
- Agent Installation/Update via the Goliath Console
- Agent Installation/Update for Gold Images, Master Images, & Templates
- Silent Agent Installation/Update
- Agent Installation/Update via Installer
- Agent Installation/Update via Command Line